So, you've decided to take your outdoor cooking game to the next level? Well, you're in for a treat! Building your DIY outdoor kitchen can be a rewarding project that turns your backyard into a culinary oasis. Whether you're a grill master or love spending time outdoors, this step-by-step guide will help you create your dream outdoor kitchen space without breaking the bank.
Step 1: Planning Your Outdoor Kitchen
Before you start swinging that hammer, it's crucial to have a solid plan in place. Here are some things to consider:
Location, Location, Location: Where you put your outdoor kitchen matters. Think about the prevailing wind, sun exposure, and proximity to your indoor kitchen for convenience.
Budget: Determine how much you're willing to spend and stick to it. DIY can save you money, but getting carried away is easy.
Functionality: What do you want to do in your outdoor kitchen? Grill, prep, dine, or all of the above? Make a list of the essential features you want.
Materials: Decide on the materials you'll use for your kitchen. Common choices include wood, metal, and stone. Your choice should match your style and budget.
Step 2: Design Your Outdoor Kitchen
Now, it's time to get creative with your design. Draw a rough sketch of your outdoor kitchen layout. Here's a simple checklist to consider:
Countertop Space: You'll need ample space for food prep, so plan for countertops. Granite, concrete, or stainless steel are great options.
Appliances: Think about the appliances you want. A grill, sink, and maybe a mini-fridge are popular choices.
Storage: Incorporate cabinets or shelves for storing cooking utensils, plates, and other essentials.
Seating: Don't forget seating options for family and guests. This could be anything from bar stools to a full dining table.
Shade and Lighting: Consider adding a pergola or umbrella for shade and good lighting for evening cookouts.
Step 3: Gather Your Tools and Materials
Once your plan is nailed down, it's time to gather your tools and materials. Here's a basic list of what you'll need:
Tools
· Measuring tape
· Level
· Circular saw
· Screwdriver
· Drill
· Hammer
· Trowel
· Masonry tools (if using stone)
· Safety gear (gloves, safety glasses)
Materials
· Framing lumber (2x4s or 4x4s)
· Plywood or cement board (for countertops and base)
· Screws and nails
· Outdoor-rated screws
· Gravel (for leveling)
· Concrete mix (if using a concrete countertop)
· Countertop material (granite, concrete, etc.)
· Outdoor kitchen appliances
· Cabinets or storage units
· Plumbing fixtures (sink, hose)
· Electrical materials (if adding lighting or appliances)
· Stone or tile (for facing or backsplash)
· Paint or sealant (for finishing touches)
Step 4: Build the Frame
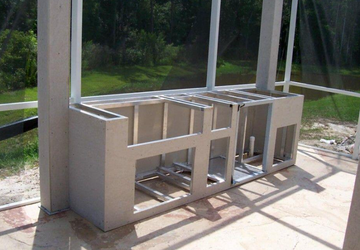
Now, it's time to get your hands dirty. Start by building the frame for your outdoor kitchen. This frame will provide support for your countertops and appliances.
Measure and mark where your kitchen will be. Use a level to ensure everything is square. Dig holes for the corner posts if you're using them. These will provide extra stability. Attach your 2x4 or 4x4 frame to the corner posts or directly to a solid surface like a patio or deck. Make sure everything is level and secure before moving on.
Step 5: Create the Base
With the frame in place, it's time to create the base for your outdoor kitchen. This will serve as a sturdy foundation for your countertops.
· Lay down a layer of gravel to ensure proper drainage.
· Attach plywood or cement board to the frame to create the countertop base. Make sure it's level.
· If you're going for a concrete countertop, mix and pour the concrete on top of the base. Smooth it out and let it cure.
Step 6: Install Appliances and Utilities
Now comes the fun part—installing your appliances and utilities. Here are some basic steps for adding a grill, sink, and other goodies:
Cut holes in your countertop base for your sink and grill, following the manufacturer's instructions. Install the sink and plumbing fixtures. Ensure everything is sealed properly to prevent leaks. Place your grill and any other appliances in their designated spots. Connect gas or electrical lines as needed. This may require professional help, so don't hesitate to call in the experts.
Step 7: Add Countertops and Facing
The countertops are where you'll do most of your food prep, so choose a durable and stylish material. If you're using granite or another stone, follow these steps:
· Measure and cut the countertop material to fit your outdoor kitchen.
· Apply a strong adhesive to the base and set the countertops in place.
· Add a backsplash if desired, using the same material or a complementary one.
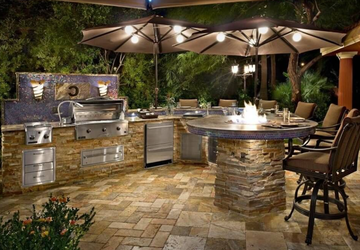
· For a finishing touch, consider adding stone or tile facing to the front of your kitchen for a polished look.
Step 8: Storage and Seating
Now it's time to add some storage and seating options to your outdoor kitchen:
Install cabinets or shelves for storing cooking utensils, plates, and other essentials. Place your table and chairs in the designated spot if you're adding a dining area. You can also consider adding a bar area with stools for a casual dining experience.
Step 9: Shade and Lighting
To make your outdoor kitchen more functional, think about shade and lighting:
Install a pergola or umbrella to provide shade during hot days. Add outdoor lighting for evening cookouts. Solar-powered lights are a cost-effective option.
Step 10: Final Touches and Maintenance
· You're almost there! Now, take a step back and admire your hard work. To finish up:
· Give your outdoor kitchen a good cleaning to remove construction dust or debris.
· Apply a sealant to your countertops and facing material to protect them from the elements.
· Add some outdoor-friendly decor and personal touches to make the space your own.
· Regularly maintain your outdoor kitchen by cleaning appliances, checking for needed repairs, and keeping the area tidy.
Wrap-Up!
Your DIY outdoor kitchen is not just a practical addition to your home; it's an expression of your personality and a hub for creating lasting memories with friends and family. So, roll up your sleeves, get creative, and savor the satisfaction of a job well done as you cook, dine, and make cherished moments in your outdoor culinary haven. Happy grilling!


